Yakuza 0's Six Fighting Styles at a Glance
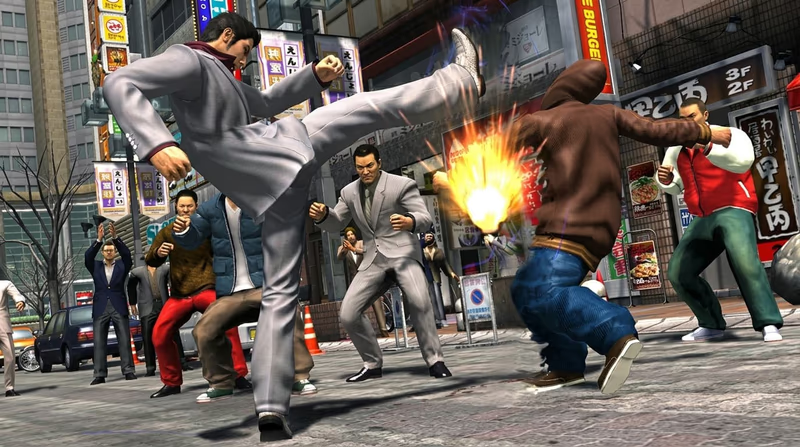
Kiryu and Majima each carry three distinct fighting styles from early in the story, and no single one of them covers every situation, which is the entire point of the system. Kiryu's Brawler trades punches at close range and doubles as the most balanced all-rounder, Rush sacrifices power for speed and evasion against groups, and Beast turns him into a blunt-force demolition crew who rips railings and signposts out of the ground mid-fight. Majima's trio leans theatrical to match his personality: Thug slashes through crowds with a switchblade and quick combos, Slugger swings bats and golf clubs with real home-run weight, and Breaker channels breakdancing into unpredictable, evasive strikes that confuse enemies trying to lock on.
Switching styles mid-fight, not picking one and sticking with it, is what separates a player who's merely clearing fights from one who's actually using the system. A Rush opener to close distance on a group, a Beast finisher once they're clustered, and a Brawler fallback for one-on-one cleanup is a completely normal flow inside a single street encounter.
Unlocking Dragon of Dojima (Kiryu) and Mad Dog of Shimano (Majima)
Both protagonists hide a fourth, "Legend" style behind their respective business storylines rather than behind combat milestones, which surprises a lot of first-time players expecting a boss fight to be the gate. Kiryu's Dragon of Dojima unlocks once Real Estate Royale is fully completed, culminating in the defeat of the Finance King who's been secretly running Kamurocho's property war the entire time. Majima's Mad Dog of Shimano unlocks the same way through Cabaret Club Czar, once the Grand has climbed to the top of Sotenbori's nightlife scene and every rival club has been dethroned.
- No shortcuts: Neither Legend style can be rushed through combat alone, the business minigame has to be finished start to finish.
- Why it's worth it: Both Legend styles come with their own standalone skill trees, hit harder than the base four styles, and visually mark the moment each protagonist stops being an underdog and starts being a legend in Kamurocho and Sotenbori's eyes.
- Timing: Because the business storylines take real investment, most players naturally unlock their Legend style somewhere in the back half of the campaign, not the opening hours.
Finding Every Martial Arts Master
Six hidden masters, three tied to each protagonist, offer style-specific training that teaches new moves no shop or level-up ever grants. Kiryu trains under Bacchus for Brawler technique and Kamoji for Rush footwork, with a third master guiding his Beast style once it's unlocked. Majima trains Slugger fundamentals with Fei Hu at the Dragon & Tiger in Sotenbori and Breaker technique with Areshi, alongside a third master for his Thug style, most commonly cited as Komian, though that name varies slightly across community references.
- Gate requirements: Masters won't appear or won't offer new lessons until you've already put enough skill points into their associated style, so a few early CP investments are usually required just to trigger their questline.
- Five lessons each: Every master runs through a short series of training missions, roughly five apiece, each one unlocking a new technique or combo extension on completion.
- Don't skip them: The moves taught by masters are often stronger and more versatile than anything purchasable through the normal CP skill menu, which makes tracking them down non-optional for serious combat builds.
Best Early Skills to Unlock in Each Style
With six styles and limited early CP, prioritization matters more than it looks like it should. Brawler players should chase combo extenders first since Brawler's base moveset feels sluggish without them, while Rush players get the most mileage out of evasion and counter-timing skills that make the style's fragility manageable. Beast benefits most from grab-based Heat Actions, since Beast's entire identity is built around environmental weapons and crowd control rather than raw combo length.
- Thug (Majima): Prioritize dash-attack extensions, Thug's crowd-clearing potential depends on closing distance fast.
- Slugger (Majima): Early Heat gauge skills pay off disproportionately, since Slugger's finishers are some of the highest damage-per-hit in the game.
- Breaker (Majima): Invest in reversal and dodge-read skills first, Breaker is the hardest style to use defensively until those come online.
- General rule: Spend CP on whichever style you're actually fighting with that week rather than spreading thin across all six, since Yakuza 0 never forces you to master every style simultaneously.
The Dragon & Tiger: The Search Agents and Funding Expeditions
Fei Hu and Long Hua run the Dragon & Tiger in Sotenbori as a front for something much stranger than a restaurant, an international network of search agents you can fund to hunt down rare crafting materials across the globe. The roster of hirable agents is genuinely eclectic, ranging from an Ex-Yakuza and a Weapon Master to a Traveling Cellist and a Self-Proclaimed Devil, and each one can be dispatched to specific overseas destinations like the criminal syndicate 5JC, the Moscow bar Kak Dela, or the North American dive bar known as The Jackal.
- Budget scales results: Every destination has its own minimum funding requirement, and underfunding an expedition is the most common reason players think the system is broken when it's actually just working as intended.
- Match agent to destination: Certain agents are flavored toward certain regions or material types, an Ex-Special Agent or International Spy reads as a better fit for espionage-flavored destinations than, say, a Rock Musician.
- Patience pays: Expeditions run in the background while you keep playing, so the efficient approach is funding several agents at once across different destinations rather than babysitting one trip at a time.
Crafting the Best Weapons
Fei Hu doesn't hand over his best weapon recipes for free, he teaches Majima in exchange for help acquiring the rare materials his own network can't easily reach, which is the entire reason the search agent system exists. The highest tier of craftable weapons, bats, blades, and blunt instruments with stat totals far above anything sold at Bantam or the back-alley shops, require stacking multiple rare materials pulled from the pricier overseas destinations rather than a single lucky find.
- Craft, don't just buy: Shop-bought weapons cap out well below what the Dragon & Tiger's top recipes can produce once fully upgraded.
- Stack funding over time: Because rare materials often require repeated successful expeditions to the same high-budget destination, treat weapon crafting as a mid-to-late game project you feed money into steadily, not a one-time purchase.
- Prioritize your main style's weapon: Craft upward for whichever base style, and later Legend style, you're actually fighting with, since a maxed weapon for a style you've abandoned is wasted investment.
Between the six base styles, two Legend styles, six hidden masters, and a full crafting economy running through the Dragon & Tiger, Yakuza 0's combat systems reward exactly the kind of obsessive, do-everything playstyle the rest of the game encourages everywhere else.