Grand Theft Auto: San Andreas Review: Rockstar's Sprawling West Coast Epic
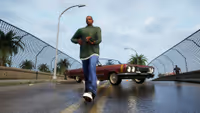
Grand Theft Auto: San Andreas sent CJ across three fictional cities and an entire state, building the biggest, most ambitious open world of the PS2 era.
Grand Theft Auto: San Andreas — Rockstar North, 2004

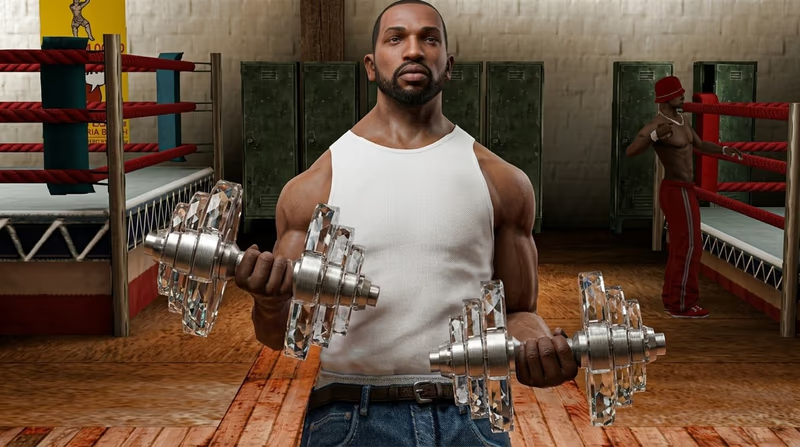
San Andreas was the first Grand Theft Auto to treat CJ's body as something you actually manage rather than a fixed model, and the three underlying numbers, Fat, Muscle, and Stamina, quietly shape how the whole game plays. Fat climbs from fast food binges at Cluckin' Bell or Well Stacked Pizza and drags down CJ's running speed and stamina regeneration the higher it gets. Muscle raises max health and visibly reshapes CJ's model at the gym mirror, turning a skinny ex-gang member into the broad-shouldered build the box art promised. Stamina governs how long CJ can sprint, swim, or cycle before gassing out, and it rises passively just from doing those activities often.
Ignore these systems entirely and CJ still finishes the story, but a neglected, scrawny CJ moves slower, fights weaker, and looks visibly worse in cutscenes than one built up with even a few gym trips.
Three gyms sit across the state, Los Santos (Ganton), San Fierro, and Las Venturas, and each one runs the same bench press and curl-bar minigames to pack on Muscle. Hold the button at the right moment during the rep prompts and Muscle rises steadily, usually maxing out within a handful of focused gym visits rather than hours of grinding. Running, cycling, and swimming out in the open world raise Muscle more slowly as a side effect, useful if you're already doing those things for Stamina but not worth detouring for on their own.
Pair gym Muscle gains with a clean diet and CJ stays lean and strong at the same time, which matters because Fat and Muscle interact rather than existing in isolation.
Once Fat creeps up, cardio is the only way back down, and the gym treadmill or stationary bike burns it off dramatically faster than jogging the streets of Los Santos. A gym cardio session trims Fat in a fraction of the time an equivalent outdoor run takes, since the open-world version of running has to compete with traffic, hills, and the player actually wanting to get somewhere. Swimming works too, and it double-dips into Stamina gains at the same time, making the pool one of the most efficient single stops in the whole stat-grinding loop.
A CJ sitting at minimum Fat and maximum Muscle is the build most players end up chasing, and it's achievable in well under an hour of focused gym time if you're not multitasking it with story missions.
Every weapon category, pistols, SMGs, shotguns, rifles, has its own hidden skill meter that climbs purely through use, Poor, then Gangster, then Hitman at the top. A weapon at Hitman level handles with noticeably tighter accuracy and longer effective range than the same gun at Poor, which on a rifle or pistol is the difference between landing headshots at range and spraying wide. The grind is blunt but effective: keep firing a weapon category at targets (enemies, or Ammu-Nation's shooting range for a controlled, enemy-free option) and the meter rises on its own.
Prioritize whichever category you actually fight with most, there's no reason to grind a weapon class you rarely carry just to say it's maxed.
Hitman level isn't just a stat bump for most weapons, for four specific ones it unlocks dual wielding outright: the 9mm Pistol, the Tec-9, the Micro SMG, and the Sawn-off Shotgun. Two of the same weapon in each hand roughly doubles effective fire rate, and CJ keeps the ability to walk and strafe while firing instead of planting his feet, which single-wielded weapons don't allow at any skill level. It's the single most dramatic combat upgrade in the stat system, turning a once-average close-range weapon into a genuine crowd-clearer.
This is worth grinding out specifically before a serious gang war push, since a dual Micro SMG build chews through turf war waves far faster than a single pistol ever will.
CJ's handling behind the wheel isn't static either. Time spent driving cars raises a hidden Driving skill that reduces fishtailing on turns and allows higher sustained speeds without losing control, while separate meters track Bike skill (motorcycles and BMX) and Flying skill (planes and helicopters), each improving handling and stability for their respective vehicle class the more they're used. There's no dedicated minigame for any of the three, they rise purely from logging seat time, which makes them the most passive stat in the whole system, you're building them just by playing normally.
If you want Flying skill specifically maxed before a mission that demands precision piloting, a few loops in a Dodo or Cropduster around an open stretch of desert gets there faster than waiting for it to happen organically mid-story.
Lung Capacity tracks how long CJ can stay underwater before needing to surface, and like Driving and Flying, it climbs from simple repetition, extended underwater swims push the meter up gradually. The fastest confirmed route to max it out is collecting all 50 Oysters scattered across the map's coastline and seabed, since the collectible hunt forces exactly the kind of repeated underwater time that trains the stat, with the added bonus of a cash reward and a story-relevant unlock for finishing the set.
Respect is less a single stat grind and more a byproduct of actually engaging with the game's systems, Rockstar built it to reward CJ for acting like the gang leader the story wants him to become. Completing story missions grants the largest, most reliable chunks, especially the ones tied directly to the Grove Street Families' plot, while territory takeovers and recruiting homies add smaller, repeatable amounts on top. Wardrobe choices matter too: certain clothing items and haircuts tied to the Grove Street aesthetic (green shirts, hoodies, specific barber styles) nudge Respect upward, alongside owning properties and keeping a well-stocked garage.
Respect isn't just a vanity number, it gates how many homies will follow CJ into a fight and unlocks certain story missions outright, so it's worth treating as a priority stat rather than an afterthought.
Each of the three gyms doesn't just train Muscle, it also teaches CJ an entirely new unarmed fighting style once you pay for and complete its lessons, stacking on top of the default Street style CJ starts with. Los Santos's Ganton gym teaches Boxing, built around rapid multi-punch combos. San Fierro's gym teaches Kung Fu, trading punch volume for sharp martial-arts kicks. Las Venturas rounds it out with a style built on dirty, improvised tactics, groin kicks and knee strikes that trade elegance for raw disruption. CJ can switch freely between every style he's learned from the weapon wheel, picking whichever fits the fight in front of him.
Learning all three isn't just a completionist box to tick, switching styles mid-fight based on whether you're facing a crowd or a single rival turns San Andreas's hand-to-hand combat from an afterthought into something with real tactical range.

Affiliate link: Support the blog via Instant Gaming at no extra cost.
Grand Theft Auto: San Andreas
Others Posts
Grand Theft Auto: San Andreas sent CJ across three fictional cities and an entire state, building the biggest, most ambitious open world of the PS2 era.
A complete main-story walkthrough for Grand Theft Auto: San Andreas, covering every mission from Grove Street to Las Venturas with strategies for the game's toughest story beats.
A complete checklist for reaching 100% completion in Grand Theft Auto: San Andreas, covering every collectible, vehicle mission, driving school, and asset you need to lock down.

A complete breakdown of San Andreas's gang war system — how to trigger territory takeovers, beat the Ballas and Vagos in a turf war, and turn Grove Street into a money-printing empire.
Grand Theft Auto IV: The Complete Edition bundles Niko Bellic's original story with both Episodes from Liberty City DLCs, and still holds up as one of the most atmospheric open worlds Rockstar ever built.

Valve took the tightest puzzle design in the industry, doubled the toolset, added a co-op campaign and two of gaming's best-written characters, and somehow made the sequel better than the original.

Anno 1800 rebuilds the series around the smoke and steel of the second Industrial Revolution, turning supply-chain logistics into the genre's richest city-building puzzle.
An engineering retrospective on the Nintendo Game Boy Color. We explore how a double-speed Sharp SM83 core, a backward-compatible palette-mapped color LCD, and translucent 'Atomic Purple' shells turned a stopgap handheld into the system that carried Pokémon's second generation.

Analysis of the PlayStation 4 and PS4 Pro hardware. We examine the shared CPU bottleneck, the mirrored butterfly GPU design, memory optimizations, and the hardware-level checkerboard rendering that enabled the 4K transition.
games
Techland traded gritty realism for painterly legend in this arcade-shooter retelling of the Old West's most famous gunslingers, bounty hunters, and outlaws.